Install FreeBSD alongside Windows and Linux
On my Thinkpad T470, I have Windows 10 and Ubuntu 20.04 installed, partitioning the entire disk between the two operating systems. Here are my notes on installing FreeBSD 13.0, squeezing it in with Windows and Linux.
Set Up
The prep work for the installation is done Windows 10.
At one point we boot into Linux from the bootable Ubuntu memstick to resize the Linux partition on the disk. After FreeBSD installation is complete we will boot into the Linux installation to finish the rest of the work.
I have a Cygwin installation on Windows 10 and I use the bash shell to do some of the smaller tasks quickly.
Prerequisites
- Two USB drives to boot Linux and FreeBSD from.
- A tool like Rufus to create bootable USB drives.
- FreeBSD-13.0-RELEASE-amd64-mini-memstick.img.xz - The FreeBSD 13.0 mini memstick image.
- CHECKSUM.SHA512-FreeBSD-13.0-RELEASE-amd64 - Also get the SHA checksum file for the FreeBSD download. It's listed on the same page where the image is.
- ubuntu-20.04.2.0-desktop-amd64.iso - Ubuntu 20.04 LTS iso image.
- Familiarity with using the vi editor to edit files.
Make sure the downloaded files are intact. Run sha512sum.exe in Cygwin's shell
sha512sum.exe --ignore-missing -c CHECKSUM.SHA512-FreeBSD-13.0-RELEASE-amd64
and it should report 'OK'
FreeBSD-13.0-RELEASE-amd64-mini-memstick.img: OK
Decompress the FreeBSD memstick image file
xz -dv FreeBSD-13.0-RELEASE-amd64-memstick.img.xz
Now, one by one, plug in the USB sticks and use Rufus to write the OS images to the drives to create bootable disks out of them. Rufus has a simple GUI that is self explanatory.
Resize a partition to create free space for FreeBSD
Boot into Ubuntu from memstick (not your local installation). Open the Disks utility, choose the Ext4 partition in the diagram, hit the button with little gears to pull up options and select 'Resize'. Change it to something reasonable. I created 30 GB free space for my FreeBSD installation.
The image below shows the layout, after the installation was done. The selected block would read 'free space' when you first resize the partition.
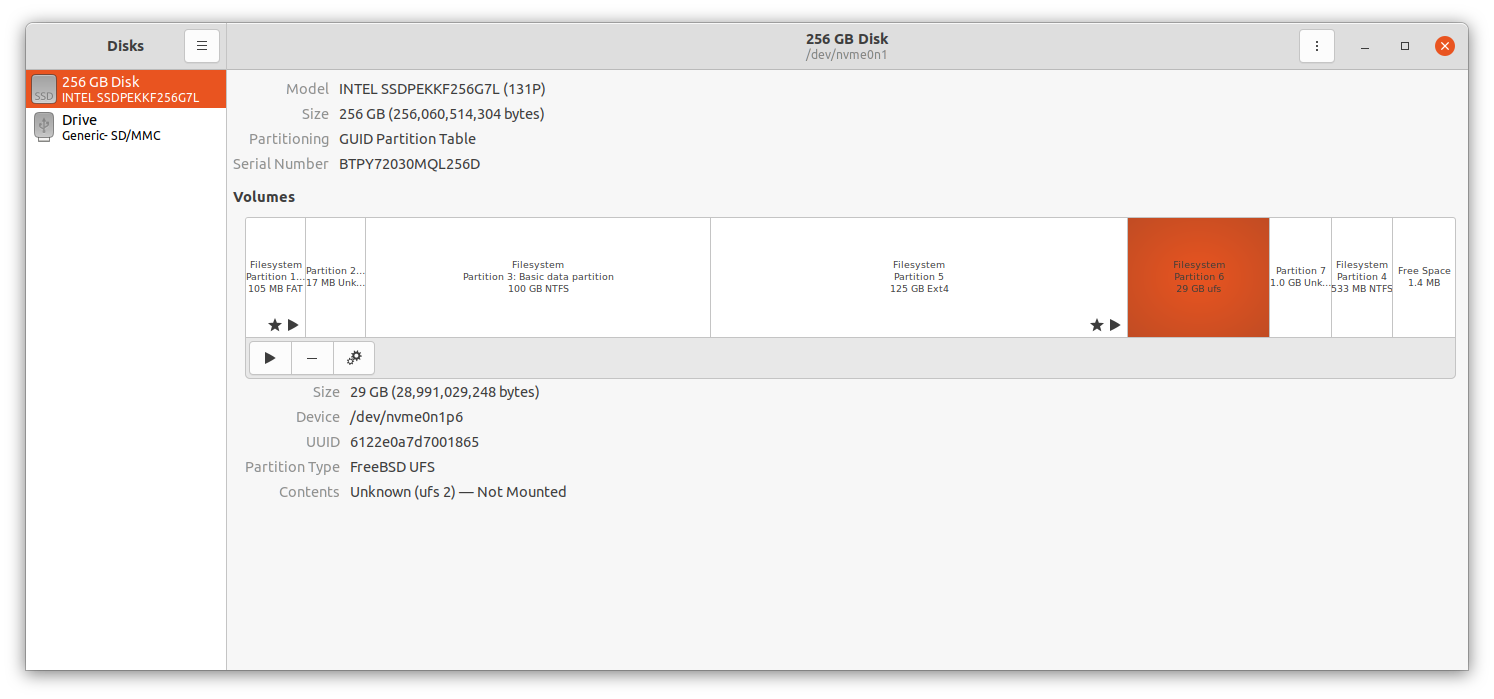
At this point, make a note of your disk layout. You can either jot down the layout on paper from the diagram in the Disks utility, or run
sudo fdisk -l
where it prints this out
Device             Start       End   Sectors   Size Type
/dev/nvme0n1p1      2048    206847    204800   100M EFI System
/dev/nvme0n1p2    206848    239615     32768    16M Microsoft reserved
/dev/nvme0n1p3    239616 195721027 195481412  93.2G Microsoft basic data
/dev/nvme0n1p4 499075072 500115455   1040384   508M Windows recovery environment
/dev/nvme0n1p5 195721216 440481791 244760576 116.7G Linux filesystem
/dev/nvme0n1p6 440481792 497104895  56623104    27G FreeBSD UFS
/dev/nvme0n1p7 497104896 499075071   1970176   962M FreeBSD swap
Again, this is output after FreeBSD installation. The last two lines is the FreeBSD UFS and swap partitions, which were unnamed initially after you resized the EXT4 and created 30 GB of free space. You will need this layout later to refer to the partitions when you install FreeBSD or work on fixing the boot loader.
Linux uses the prefix nvme0 to refer to the physical disk on my system. FreeBSD will use the prefix nvd0.
Install FreeBSD
Boot from FreeBSD USB stick and start the installation. Follow prompts, they are mostly routine things. At the disk partitioning step, don't choose the 'manual' option, but the automatic one where you point the tool to the disk where you want to install FreeBSD. Select nvd0 and FreeBSD will pick the free space and lay out the UFS and swap in there. You don't need to decide on the swap size.
Continue and finish the rest of the installation steps.
Reboot your system and FreeBSD will start running. You will not see your Grub interface anymore because FreeBSD wipes it out. The next thing to do is restore Grub.
Restore Grub
Boot your system from the Ubuntu memstick. Ubuntu displays a Grub menu first, type in c to enter Grub's console.
List the devices and partitions using. You will see the partitions numbered the way you found them in the fdisk output. On my system, partition number 5 is the Linux partition, and I run ls to make sure it is so by taking a look at the contents of the Linux root file system. The usual directory layout confirms that.
Note: that at this point, you have your USB memstick plugged in and mounted. That disk become hd0 and my laptop disk is hd1. Later, when the memstick isn't there and you have to write a Grub entry manually for your FreeBSD boot loader, you will refer to your disk as hd0.
ls (hd1,gpt5)/
Next, type in the following commands to boot the Linux at (hd1,gpt5):
linux (hd1,gpt5)/boot/vmlinuz root=/dev/nvme0n1p5
initrd (hd1,gpt5)/boot/initrd.img
boot
This boots Linux.
Once you are in there, reinstall Grub to the MBR. As I have said before, my laptop has only one disk with multiple partitions for multiple operating systems. The disk is identified as /dev/nvme0n1 (look in /dev/) and each partition is labeled nvme0n1px where x is the number of the partition. A boot loader is installed to the MBR of a disk and not a partition, so you drop the px suffix in the following command:
grub-install /dev/nvme0n1
Now reboot your system and you should be at the Grub boot menu. In the list, as usual, you will find Ubuntu and Windows. There is no FreeBSD, which you have to add by hand.
Boot FreeBSD
Here is more than one way I boot FreeBSD on my system.
On my Thinkpad T470, when the system boots, I hit Enter to interrupt normal boot and the hit F12 to get to the boot options. In there is listed Ubuntu and FreeBSD. I can choose and boot FreeBSD from here. My system automatically finds out a bootable FreeBSD partition and lists it in its boot options.
Note: Below, I describe the procedure, but the entry below did not work for me. My fallback was the situation I described above. If you are able to find out a working Grub entry for FreeBSD 13.0, let me know please.
To the file /etc/grub.d/40_custom, add this block
menuentry 'FreeBSD'{
insmod ufs2
    root=(hd0,gpt6)
    chainloader /boot/loader.efi
}
And then run
sudo update-grub2Next time you boot, an entry named 'FreeBSD' will appear in the Grub menu. Select it to boot FreeBSD.
Another option, that worked for me, is to type in c at the Grub prompt to fall into the Grub console. In there type exit to quit the shell, and FreeBSD will boot up.
Enable WiFi in FreeBSD
During installation, FreeBSD fails to set up my wireless drivers. So I had to configure it manually this way:
- Log in as root
Check that your wireless device is there
sysctl net.wlan.devicesWhich printed
net.wlan.devices: iwm0Add this entry to /etc/wpa_supplicant.conf
newtwork={
    ssid="wifi name"
    psk="wifi password"
}
Add these two lines to /etc/rc.conf
wlans_iwm0="wlan0"
ifconfig_wlan0="WPA SYNCDHCP"
Restart the service and you should have your WiFi connection working
service netif restartTo have WiFi start automatically at boot time, add this line to /boot/loader.conf
if_urtw_load="YES"On startup, FreeBSD will automatically connect.
References
- Rufus
- FreeBSD
- Ubuntu
- FreeBSD Wireless Networking (FreeBSD Documentation)
- FreeBSD Setup for Automatic Wireless Connection
- Basic vi Commands